
Are you having trouble removing your bike crank without a puller? Don’t worry, we’ve got you covered! A crank puller is a handy tool that can make this process much easier, but not everyone has access to one. In this blog post, we will provide you with step-by-step instructions on how to remove your bike crank without a puller. We’ll also give you some essential tips and tools that will come in handy during the process. So put on your hand protection and let’s get started!
What Is a Crank Puller?

A crank puller is a tool that helps to remove the cranks from your bike. It’s an essential tool that every cyclist should have in their toolbox. The crank puller works by removing the crank arm from the spindle of your bike’s bottom bracket.
The tool consists of two parts: a threaded steel rod and a handle. The threaded rod screws into the hole on your bike’s spindle, while the handle provides leverage to unscrew and remove the crank.
Without a crank puller, it can be quite difficult to remove your bike’s cranks, especially if they have been installed for some time or are tightly screwed on. Many people resort to using hammers or other tools which can damage their bikes.
Investing in a good quality crank puller is worth it as it will make removing and reinstalling your cranks much easier. So if you’re serious about maintaining your own bike, adding this tool to your toolkit is definitely something you should consider!
Essential Tools You Required

If you’re planning to remove your bike crank without a puller, then it’s essential to have the right tools. Without these tools, the job can become challenging and frustrating. Here are some of the important tools that you’ll need for this task. Having these essential tools before starting any repair is always recommended because it makes everything much more straightforward and enjoyable!
1. A Pair of Old Rags and Clothing
When it comes to removing a bike crank without using a puller, having a pair of old rags or clothing is essential. Why? Because you’ll need them to protect the bike frame from scratches or damage while working on the cranks.
Firstly, before doing anything else, lay down an old rag or cloth under the bike chainring area where you will be working. This will prevent any oil or dirt stains on your floor. Secondly, use another piece of cloth to hold onto the crank arm firmly while removing its fittings.
It’s crucial not to scratch or damage your bike frame during this process as it can affect its overall performance and durability in future rides. Therefore, wrapping some rags around other parts of your bicycle that could come into contact with tools such as pliers and screwdrivers is also advisable.
2. Screwdriver Allen Keys

Screwdrivers and Allen keys are essential tools when it comes to removing bike cranks without a puller. These tools will help you remove the nuts or bolts that secure your bike crank in place. When choosing screwdrivers, make sure to select ones that fit snugly into the bolt heads.
Allen keys, on the other hand, come in different sizes and shapes, so it’s important to choose one that fits the size of your crank bolts perfectly. Using an Allen key that is too small or big may damage your bike’s components.
It’s also crucial to invest in high-quality screwdrivers and Allen keys as low-quality ones can easily slip out of bolt heads or strip them entirely. This could cause serious damage to your bike and ultimately cost you more money in repairs.
3. The Spindle Driver’s crankshaft bolts and nuts
When it comes to removing a bike crank, having the right tools is crucial. One of these essential tools is the spindle driver’s crankshaft bolts and nuts.
These bolts and nuts are what connect your bike’s cranks to the bottom bracket spindle. They can be found on either side of the bike’s bottom bracket assembly.
Before attempting to remove these bolts and nuts, make sure you have a wrench that fits them properly. Using an ill-fitting tool may damage the bolt or nut, making it more difficult to remove.
It’s also important to note that different bikes may require different sizes of bolts and nuts. Be sure to check your bike’s manual or do some research beforehand so you know exactly what size wrench you need.
4. Bike Stand
A bike stand is an important tool when it comes to removing the bike crank without a puller. It serves as a support system that keeps your bike stable and secure while you work on it.
You don’t want to be struggling with balancing your bike or risking damaging it by propping it up against something unstable. Using a proper bike stand makes the process of removing the crank much easier and safer.
There are different types of bike stands available in the market, from simple ones that clamp onto your frame to more sophisticated ones with adjustable features for customization.
Investing in a good quality bike stand will not only make working on your bicycle more efficient, but will also prolong its lifespan by preventing unnecessary damage caused by accidents during maintenance.
5. Lubricants
Lubricants are essential when removing bike cranks without a puller. They help to make the process smoother and prevent any damage to your bike parts during removal. There are different types of lubricants, but the best for this task is a penetrating oil.
This type of oil helps to loosen the nuts or bolts holding the crank in place, making it easier to remove them without causing any harm. You can apply it using a brush or spray directly onto the affected area.
When applying lubricant, ensure that you cover all the necessary areas around and under where you’re working on. This will help reduce friction between surfaces and avoid damaging delicate parts.
Step-by-Step Guide: How to Remove Bike Crank without Puller

Removing a bike crank may seem daunting, especially when you don’t have the right tools like a crank puller. However, with some essential tools and this step-by-step guide, you can remove your bike’s crank easily without any hassle. By following these simple steps mentioned above without requiring any specialized toolset whatsoever will enable you to disassemble your bike crank in no time.
Step 1: Wear Hand Protection
The first step in removing a bike crank without using a puller is to wear hand protection. This may seem like an obvious and simple step, but it is essential for your safety.
Bike cranks are held onto the bottom bracket spindle by nuts or bolts, which can be difficult to remove without the right tools. Using pliers or other tools can cause damage to both the bike and your hands.
Wearing gloves will protect your hands from cuts and scrapes that could occur while trying to remove these tough nuts or bolts. It’s important to choose gloves that fit snugly but still allow you to move your fingers freely.
While some people may opt for thicker work gloves, it’s best to use thinner gloves that provide dexterity so that you can grip small parts easily. Gloves made of synthetic materials such as Nylon or Neoprene are ideal since they’re durable yet flexible.
Step 2: Remove the Bike Crank Nuts or Bolts
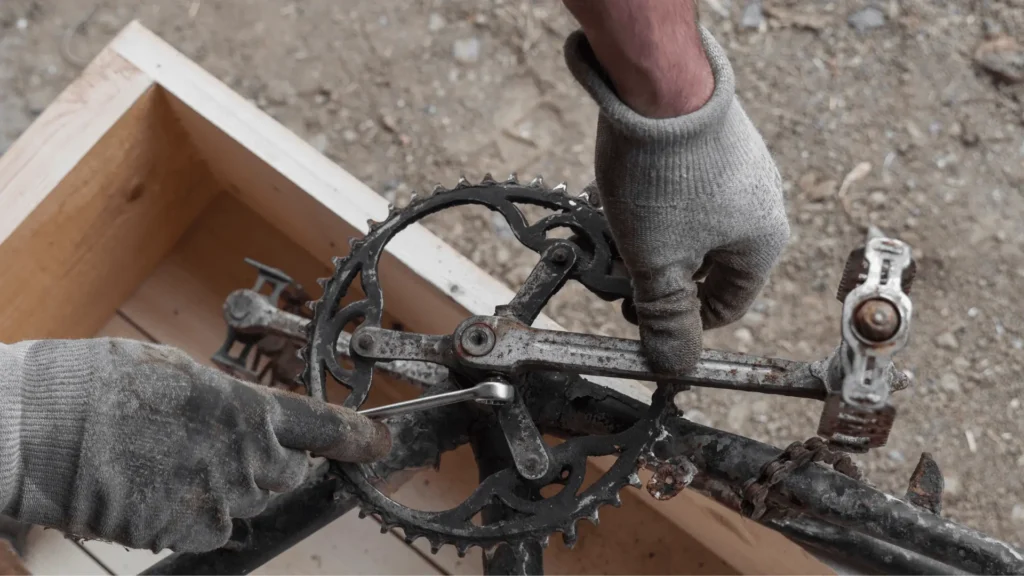
Before you begin to remove the bike crank, it is essential to have all the necessary tools ready. One of these tools that will come handy in this step are a pair of wrenches or socket sets. The size of your wrench or socket set will be dependent on the make and model of your bike.
Firstly, locate where the nuts or bolts are situated on your bike’s crankset. Once identified, use one wrench to hold onto one nut while using another wrench to turn and unscrew the other nut.
If you encounter any resistance when trying to loosen up a bolt or nut, don’t apply excessive force as it might cause damage. Instead, try lubricating them with grease or penetrating oil before retrying.
It’s essential always to keep track of every part removed from your bicycle during disassembly for easy re-assembly later on. To do this effectively in this step, place all nuts and washers in a designated container for safekeeping until needed again.
Step 3: Remove all Washers
When it comes to removing your bike crank without a puller, you need to make sure that every step is done correctly and safely. That’s why in Step 3, you’ll want to remove all washers from the bottom bracket spindle before moving on with the removal process.
The washers are usually located on both sides of the bottom bracket spindle and serve as spacers between the frame and crank arms. Make sure to keep them organized so you can put them back in their proper place during reassembly.
Removing these washers will give you better access to the bottom bracket spindle which is essential for removing your bike crank successfully. You may also need to take out any bolts that hold chainrings or spiders on both sides of your bike cranks if they are present.
Step 4: Identify the Crank and Turn the Coupler

Before we start with Step 4, make sure that you have followed Steps 1-3 carefully. Now that we are ready to proceed, let’s identify the bike crank.
The bike crank is a component of your bicycle that connects to your pedals. It is usually located at the bottom bracket of your bike frame. You can easily spot it by looking for two arms connected to a central spindle.
Once you have identified where the crank is positioned, turn the coupler in an anticlockwise direction until it comes loose from its place. This may require some force, so be careful not to damage any other parts of your bike while doing this step.
In case you’re having trouble turning the coupler by hand, try using a rubber mallet or a soft hammer as gently as possible on one side and then work on another side slowly until it releases without causing any harm.
Step 5: Insert The Spindle Driver Of The Puller On The Bike Cranks

Now that you’ve removed all nuts, washers and identified your crank, it’s time to insert the spindle driver. Take note that this step is crucial because it will determine how easy or difficult your removal process will be.
First, locate the spindle driver from your essential tools. Make sure it matches with one of the holes in your crank arm. Then position it over one hole at a 90-degree angle and apply force until it goes through smoothly.
Repeat this process for each corresponding hole in every crank arm if you have a double or triple chainring setup. If there’s resistance when inserting, do not use excessive force as this might damage either your tool or bike components.
Step 6: Rotate The Spindle Driver In A Clockwise Direction
Step 6 is where the real work begins. You need to start rotating the spindle driver in a clockwise direction carefully. It would help if you did this slowly and steadily, making sure that it fits snugly into the crank threads.
Remember not to force anything when doing this step. If you encounter any resistance, stop immediately and try again by cleaning out any debris or corrosion from the threads.
It’s essential to keep your hands protected during this process using gloves or rags so that you don’t accidentally injure yourself on sharp edges.
When turning, make sure that each turn is firm but gentle enough not to damage anything inside or outside of your bike parts!
Once you start feeling some movement in the crank spindle, continue turning until it comes off completely. This may take a few rotations depending on how tight it was initially installed.
Step 7: Remove The Thread Of The Puller Tool
After turning the spindle driver in a clockwise direction, you will notice that it starts to loosen up. At this point, remove the thread of the puller tool from your bike’s crank. This step requires a bit of patience and care as you don’t want to damage anything.
Make sure to keep track of all parts removed during this process so that you can easily reassemble them later. Check for any signs of wear or damage on both sides before proceeding with reinstallation.
It’s important to note that if there is resistance when removing the thread, do not force it. Instead, try rotating it back and forth until it comes out smoothly.
Removing the thread from your puller tool may seem like a small task but plays an essential role in successfully removing your bike’s cranks without damaging them or other components.
Step 8: Do the Same Methods for the Other Side
Once you have successfully removed the crank from one side of the bike, it’s time to move onto the other side. The process is essentially the same as before.
Start by flipping your bike over and repeating steps 1-4 on this side. Remember to keep all bolts, washers and nuts organized so that they can be easily put back in their proper place later.
Next, insert the spindle driver of your puller onto this side’s crank arm. Again, make sure it fits securely into place and doesn’t slip or slide around.
Rotate the spindle driver clockwise until you hear a loud “pop” sound, indicating that the crank has been fully loosened from its position.
Remove both sides’ cranks with care so that you don’t damage any surrounding parts or components in doing so.
Step 9: Run A Review Check On The Entire Bike

After successfully removing your bike crank without using a puller, it’s time to run a review check on your entire bike. This step is crucial as it ensures that all parts were correctly assembled and nothing was left loose during the process.
Start by checking if everything is in place such as bolts, nuts, washers and bearings. Tighten any loose screws or bolts that you may find. Make sure to use the correct tool for each part of your bike to avoid damaging anything.
Next, take some time to inspect your chainring and make sure there are no signs of wear or damage. Check if it spins freely and doesn’t rub against anything when rotating.
It’s also essential to look at the pedals and cranks themselves before taking off for a ride. Give them a spin with your hands while listening out for any unusual noises or resistance from their movement.
Give the brakes and gears system of your bicycle some tests runs too. Ensure they work smoothly without issues such as rubbing sounds which can affect performance while riding.
Pro Tips
Removing a bike crank without a puller may seem daunting, but with the right tools and technique, it can be done. Here are some pro tips to ensure you remove your bike’s crank effectively.
- Make sure to wear hand protection throughout the process to avoid any potential injuries.
- Before starting the removal process, clean and lubricate all parts of the crankset. This will help loosen any stuck parts and make removal easier.
- When removing nuts or bolts from the crank arm, use an old rag or clothing between the wrench and bike frame to prevent scratches on your bike’s paintwork.
- Always double-check that you have removed all washers from both sides of the bottom bracket spindle before attempting to turn them.
- If you encounter any issues during this process or feel unsure about proceeding further; do not hesitate to consult with a professional mechanic for assistance.
FAQs
What Is The Use Of A Crank Puller?
A crank puller is a useful tool that every bike owner should have. It is designed to remove the cranks from the bottom bracket spindle without damaging any other parts of the bike. The main purpose of this tool is to make it easier for you to replace or upgrade your crankset.
What Is The Best Bike Crank Length?
Choosing the right bike crank length can significantly impact your cycling experience. The ideal size depends on several factors, including your riding style and body measurements.
What Is The Main Difference Between A 172.5 And A 175 Crank?
When it comes to bike cranks, size matters. The main difference between a 172.5 and a 175 crank is the length of the arm that connects the pedal to the bike’s chainring. A 172.5 crank has an arm length of 172.5mm, while a 175 crank has an arm length of – you guessed it – 175mm.
What Does A Crank Puller Do?
A crank puller is a tool that allows you to remove the cranks from your bike. It’s an essential tool for any cyclist who needs to maintain their bike regularly. The crank puller works by fitting into the threaded hole in the bottom bracket and pulling on the crank arm with a lever.
Does Bike Crank Length Matter?
The length of the crank arm on your bike can have a significant impact on your cycling experience. The longer the crank arms, the greater the leverage, which means more power and speed. However, there are also downsides to using longer cranks.
Conclusion
To sum up, removing bike cranks without a puller tool can be done with the right equipment and proper technique. With patience and care, you can easily remove your bike’s crankshaft without damaging any parts of the bicycle. Remember to always have the necessary tools on hand before starting this task and wear protective gear for added safety.
Also Read: Where Should I Sit On My Bike Saddle? The Ultimate Guide


