
Winter is around the corner and skiing is an amazing activity during the cold months. For cyclists, you might want to merge your two favorite activities – skiing and riding a bicycle.
But how to carry skis on a bike? You might ask. In this article, I will show you a couple of solutions to carry skis on your bike.
Strapping the skis to the bike frame
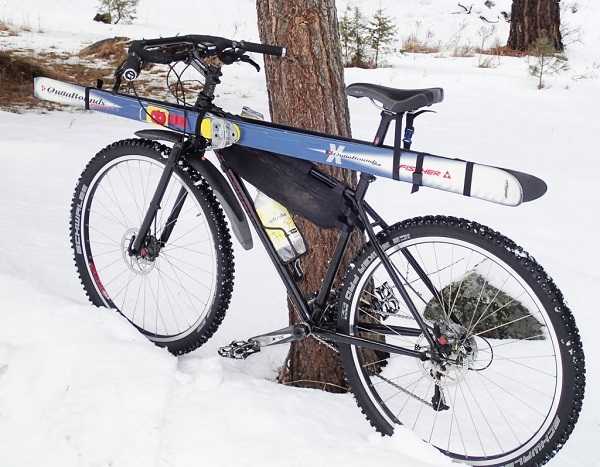
The most common and simple solution to strapping skis to a bike is to strap them to the top-tube and rack, parallel to ground. The problem with this solution is that your leg might hit the skis and also, having skis on while riding can be annoying for some.
All you’ll need are 2 ski straps.
Steps
- Lay your skis down next to your bike. Set skis tips towards the front end of your bike, and put your bindings facing out.
- Attach ski poles on your skis. (Tip: with pin bindings, the poles sit nicely in-between.)
- Attach a ski strap loop around top tube and down tube
- Slide ski tips through the front loop, one ski on each side of the bike.
- Strap round skis and saddle nose (make sure the saddle is raised) or thread a ski strap under the rails of the saddle to hold your skis.
- Tighten front strap
- Tighten rear strap
- Make sure the tips don’t reach the forks crown of your bike.
- Make sure the cables are free enough that you can still turn.
- Attach ski boots to your bindings so make sure that the strap isn’t in the way of the bindings.

Tips:
- Use more ski straps to secure the skis on your bike.
- Use a spare pair of trousers to wrap up the skis before attaching them to the bike to protect the skis from scratching and damaging.
- Use panniers to store your ski boots.
DIY method – The vertical ski holder attached to a rear rack
If you have time, you can try a DIY solution. Adding a vertical ski tube to your rack and mounting skis vertically alongside your rack. The only problem with this solution is: it would only take one low branch to truly mess up your experience with the skis sticking up that high.
You’ll need:
- A rear rack (the sturdier – the better)
- 1 PVC tube with a cap (3-5 inches in diameter x at least 18 inches long)
- 2 metal plumbing ties (also known as “general purpose couplers” or “clamps”)
- Velcro straps
- Panniers
Steps
- Mount the PVC tube to the right side of your rear rack. If you attach the PVC tube on the left (traffic side) of the bike, drivers would have a much harder time seeing your bike, which will come with a chance of having accidents.
- Use 2 metal plumbing ties to fasten the PVC tube properly in place. This step is important since you want the tube to be angled at such a degree that the skis are not hitting you in the back as well as the skis don’t fall out when you climb a steep hill. In most cases, attaching the tube on a bike angled at approximately 10 degrees works.
- Do a couple of test drives to fix the tube if its position doesn’t work for you.
- Once building a lighter carrier with PVC pipe, toss your skis and poles into the tube. Use Velcro straps to attach your poles to the skis.
- Mount panniers on the opposite side of your rear rack to store your ski boots.
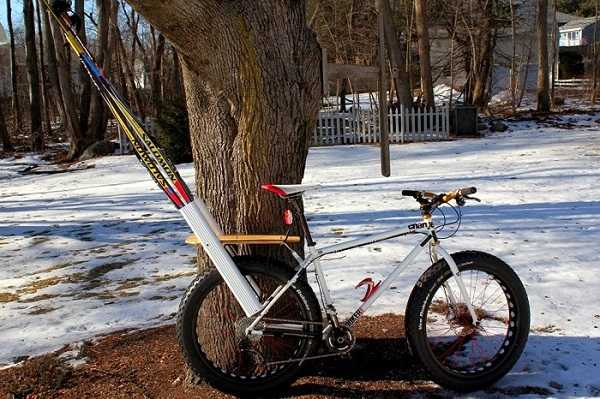
Tip: Adding some soft cloth in the bottom of the ski tube can prevent skis rattling around. Make sure your rack is securely connected to your bike otherwise you will get the wobbles. You can use a lash strap to keep the skis secure in the ski tube.
Other methods
Strap on your pack
The other option that many people use is carrying skis on the backpacks – tied together at top and one each in loops each side. You can try out this solution but keep in mind that this solution makes getting on and off the bike a bit difficult or even dangerous.
Buying a carrier made for bicycles
If you want an easy and convenient solution, consider buying a carrier made for bicycles. Such as surfboard carrier on this website: http://carversurfracks.com/


