
Are you planning to take your bike with you on a long road trip or weekend getaway? If so, installing a trunk bike rack is an excellent solution! Not only does it save space inside your car, but it also ensures your bike stays secure during transit. However, for first-time users, the installation process can seem daunting. That’s why we’ve put together this step-by-step guide on how to install a trunk bike rack easily and efficiently. So grab your tools and let’s get started!
What is a Trunk Bike Rack?
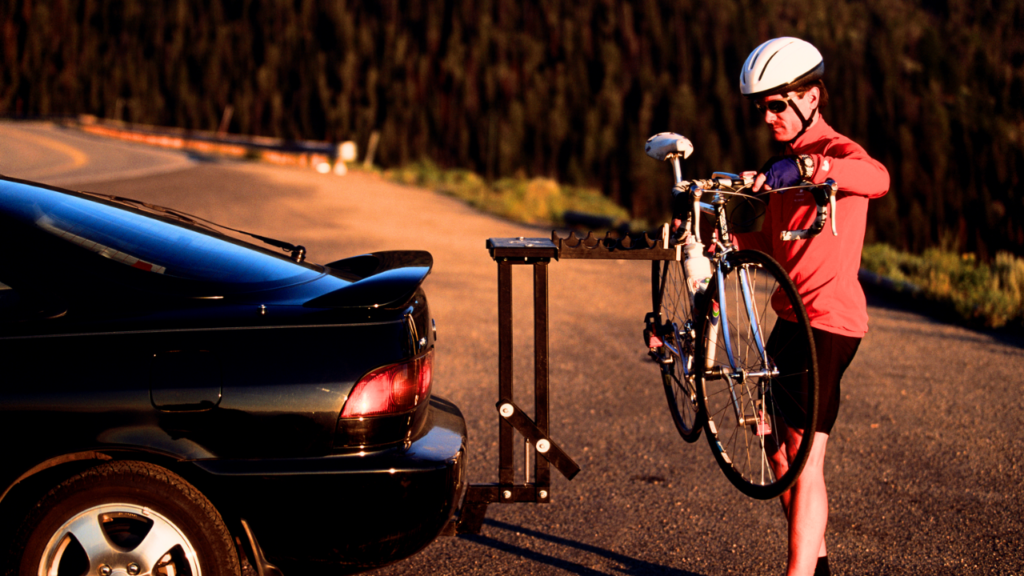
A trunk bike rack is a device that is used to transport bicycles by attaching them to the back of a vehicle. There are many different types and designs of trunk racks, but they all essentially work in the same way.
The most common type of trunk bike rack features two arms that extend from the base of the rack, which rests on top of the vehicle’s trunk lid. The rear wheels of the bicycles are then placed into cradles on the arms of the rack, and straps or clips are used to secure them in place. Some racks also feature a third arm that attaches to the bumper of the vehicle, providing additional stability.
How to Install Trunk Bike Rack?

Here are the steps to follow for installing a trunk bike rack:
- Choose the right rack: Before you start, make sure you have the right type of rack for your car and bike. Check the weight capacity of the rack to ensure it can safely carry your bike, and make sure it is compatible with your car’s make and model.
- Clean the car: Use a clean, dry cloth to clean the area where the rack will be installed. This will help the rack adhere better to the car and prevent scratches or damage.
- Install the straps: Open the rack and position it on the trunk or hatchback of your car. Attach the straps to the hooks on the rack and then attach the straps to the car, making sure they are evenly spaced and secured tightly. Follow the instructions that came with the rack to ensure proper attachment.
- Adjust the rack: Adjust the rack so it is level and centered on the car. If your rack has adjustment knobs or bolts, use them to make any necessary adjustments. Make sure the rack is securely attached to the car.
- Mount the bike: Place the bike onto the rack and secure it using the provided straps or attachments. Make sure the bike is centered and level on the rack. If your rack has adjustable arms, use them to position the bike so it is securely held in place.
- Test the fit: Before driving, give the rack a firm shake to make sure it is securely attached to the car and the bike is stable. Adjust the straps or attachments if necessary. Check the fit periodically during your trip to ensure everything remains secure.
- Uninstall the rack: When you reach your destination, remove the bike from the rack and then carefully remove the rack from the car. Make sure to follow the instructions for removing the straps to avoid any damage to your car.
By following these steps, you should be able to successfully install a trunk bike rack onto your car and transport your bike safely and securely.
Types of trunk bike racks
There are several types of trunk bike racks available on the market, each with its own advantages and disadvantages. Here are some of the most common types:
- Strap-on trunk racks: These are the most common type of trunk bike rack and are designed to attach to the trunk or hatchback of a car using straps. They are affordable, easy to install, and can be used on a wide variety of vehicles. However, they may not be as stable as other types of racks and can damage the paint on your car if not installed properly.
- Hitch-mounted racks: These racks attach to a trailer hitch on the back of a car and provide a more stable and secure way to transport bikes. They are more expensive than strap-on racks but are often easier to use and can accommodate more bikes. However, they require a hitch receiver, which not all cars have, and can be heavy and difficult to store when not in use.
- Roof-mounted racks: These racks attach to the roof of a car and provide a secure and stable way to transport bikes. They are often used by professional cyclists and provide easy access to the bikes while still leaving the trunk space available for other items. However, they are more expensive than other types of racks and can be difficult to install and remove, especially for taller vehicles.
- Trunk-mounted trays: These racks use a tray or platform to hold the bikes in place, rather than relying on straps or attachments. They provide a stable and secure way to transport bikes and can be easier to use than other types of racks. However, they are more expensive and can be heavier and more difficult to store than strap-on racks.
When choosing a trunk bike rack, it’s important to consider the type of car you have, the number of bikes you need to transport, and your budget. Consulting with a bike shop or professional installer can help you determine which type of rack is best suited for your needs.
Testing and troubleshooting
There are a few things you can do to test whether or not your trunk bike rack is installed properly. First, check to see if the rack is secure by trying to wiggle it back and forth. It should be snug against the trunk with no give. Second, try hanging a bike from the rack to see if it stays in place. The bike should be secure and not wobble around.
If you’re having trouble getting the rack to stay in place, make sure that all of the straps are tight and that the hooks are securely fastened to the car. Sometimes you may need to adjust the position of the rack on the trunk to get it to stay put. If all else fails, consult the instructions that came with your particular rack or contact the manufacturer for help.
Faq
Most trunk bike racks come with all the necessary tools and hardware you’ll need for installation. However, you may want to have a few basic tools on hand, such as a screwdriver and adjustable wrench, just in case.
Before purchasing a trunk bike rack, you should make sure it’s compatible with your vehicle. Look for a rack that’s designed to fit your car’s make and model, and check the weight capacity to make sure it can handle the weight of your bikes.
Most trunk bike racks have individual cradles or arms that hold each bike securely in place. To attach your bikes, lift them onto the rack and position them in the cradles or arms. Then, use the straps or other securing mechanisms to hold the bikes in place.
It’s possible to install a trunk bike rack on a car with a spoiler, but you’ll need to choose a rack that’s specifically designed for this purpose. Look for a rack with adjustable arms or a unique design that can accommodate the shape of your spoiler without damaging it.
Conclusion
Installing a trunk bike rack is an easy and convenient way to transport your bicycles. With the right tools, you can have it done in no time. We hope this article has provided helpful tips on how to install a trunk bike rack properly. Now that you know how to do it, why not give it a try? You’ll be glad you did!


