
Are you tired of hearing that annoying rattling noise coming from your bike’s chain every time you ride? It’s not only irritating but can also be dangerous for your cycling experience. Well, worry no more! We’ve got the perfect solution to tighten your bike’s chain with a derailleur in just a few easy steps. This comprehensive guide will help you transform your loose and lifeless chain into a lively and efficient one. So, get ready to roll smoothly on the road with our simple yet effective tips!
How to tighten a bike chain with a derailleur?
To tighten a bike chain with a derailleur, follow these steps:
- Shift the bike into the smallest chainring in the front and the smallest cog in the rear. This will give you the most slack in the chain.
- Locate the derailleur adjustment screws on the rear derailleur. There are usually two screws labeled “H” and “L” or “high” and “low.” These screws adjust the limits of the derailleur’s movement.
- Turn the pedal until the chain is on the top chainring in the front. This will allow you to easily access the chain.
- Use a chain tool or a quick-release lever to disconnect the chain from the bike.
- Move the rear derailleur forward to take up some of the slack in the chain.
- Reconnect the chain and check the tension. The chain should be tight enough that it doesn’t sag or rub against the derailleur cage, but not so tight that it restricts movement.
- Adjust the rear derailleur limit screws as needed to ensure proper shifting. Turn the H screw to adjust the upper limit of the derailleur’s travel and the L screw to adjust the lower limit.
- Finally, shift through all the gears to make sure the chain moves smoothly and quietly.
Remember to lubricate the chain regularly to keep it in good condition and prevent excessive wear.
Tools Needed for the Job
- 1. A derailleur
- 2. A chain
- 3. A chain tool
- 4. A set of Allen wrenches
- 5. A torque wrench (optional)
- 6. Grease (optional)
You’ll also need a chain tool, which is a small hand-held tool that is used to remove and install links in a bicycle chain. Most chain tools will come with a set of Allen wrenches, which are needed to adjust the derailleur. You may also need a torque wrench to properly tighten bolts on the derailleur.
Finally, you may want to apply some grease to the teeth of the derailleur before installing the new chain. This will help keep the chain from slipping off during use.
Step-by-Step Guide to Tightening a Bike Chain with a Derailleur
First, identify which derailleur pulley is closest to the ground. Then, use your hand to move the chain onto that pulley. Once the chain is on the pulley, use your other hand to turn the pedals forwards. As you do this, the chain will begin to tighten. Keep turning the pedals until the chain is tight, and then check to make sure that the derailleur is still in alignment. If it is not, then simply readjust it until it is. That’s all there is to it!
Step 1:Preparing the Bike
Here are some easy steps to follow when preparing your bike for a chain adjustment:
- First, shift your bike into the highest gear. This will give you the most slack in the chain and make it easier to remove.
- Next, use a chain tool (or a pair of pliers) to remove the old chain from the derailleur pulley wheels. You may need to remove the rear wheel in order to do this.
- Once the old chain is removed, clean any dirt or debris from the derailleur pulleys before installing the new chain.
- To install the new chain, simply feed it through the derailleur pulleys and around the sprockets on the cassette (rear gears). Make sure that the chain is seated properly on all of the teeth before continuing.
- Use the chain tool (or pliers) to connect the two ends of the chain together. Again, make sure that everything is seated properly before continuing.
- Finally, test-ride your bike to make sure that everything is shifting smoothly and there’s no excess slack in the chain. If everything feels good, then you’re done!
Step 2:Adjusting the Limit Screws
The limit screws on your bike’s derailleur are responsible for ensuring that the chain doesn’t fall off of the cassette during use. If the limit screws are too loose, the chain will be able to fall off of the cassette, which can lead to dangerous situations while riding. To adjust the limit screws, you will need a Phillips head screwdriver.
Start by shifting your bike into the largest cog on the cassette. Then, turn both of the limit screws clockwise until they are snug against the derailleur cage. Next, test the bike’s shifting by pedaling backwards and shifting into each gear. The chain should not come off of the cassette during this process. If it does, continue to turn the limit screws until the problem is resolved.
Step 3: Adjusting Cable Tension and B-Screw
To do this, you’ll need to adjust the tension of the cable that runs from the derailleur to the shifter. To do this, first locate the barrel adjuster on the derailleur. Then, use a wrench to turn the barrel adjuster clockwise or counterclockwise until the tension on the cable is where you want it.
Once you’ve adjusted the tension on the cable, you’ll need to fine-tune it with the B-screw. To do this, first loosen the locknut on the B-screw. Then, turn the B-screw clockwise or counterclockwise until you get the chain tension just right. Finally, tighten down the locknut so that everything stays in place.
Step 4: Checking the Chain Tension
To check the chain tension, first put the bike in its lowest gear. Then, with the chain tensioner attached to the derailleur, pull on the chain until it is tight. The chain should be tight enough that there is no slack, but not so tight that it binds.
If the chain is too loose, it will fall off when you shift gears. If the chain is too tight, it will bind and make shifting difficult. Either way, it’s important to keep an eye on the chain tension and adjust as necessary.
Troubleshooting Common Issues
If your bike’s chain is loose, it can cause the gears to slip or misaligned. This can be a real pain, especially if you’re in the middle of a ride. But don’t worry, there are some easy steps you can take to tighten your bike’s chain.
- First, check to see if the derailleur is properly aligned. If it’s not, then simply readjust it according to your bike’s manual.
- Next, use the barrel adjuster to fine-tune the tension on the chain. You’ll find this near the rear derailleur. Simply turn it clockwise to tighten the chain, or counterclockwise to loosen it.
- If your chain is still slipping after adjusting the derailleur and barrel adjuster, then you may need to replace your chain altogether. This is a pretty simple process that just requires a few tools: a chain breaker and a new chain. Just follow the instructions in your bike’s manual on how to do this.
With these easy steps, you should be able to get your bike’s chain tight in no time!
What is a Derailleur?
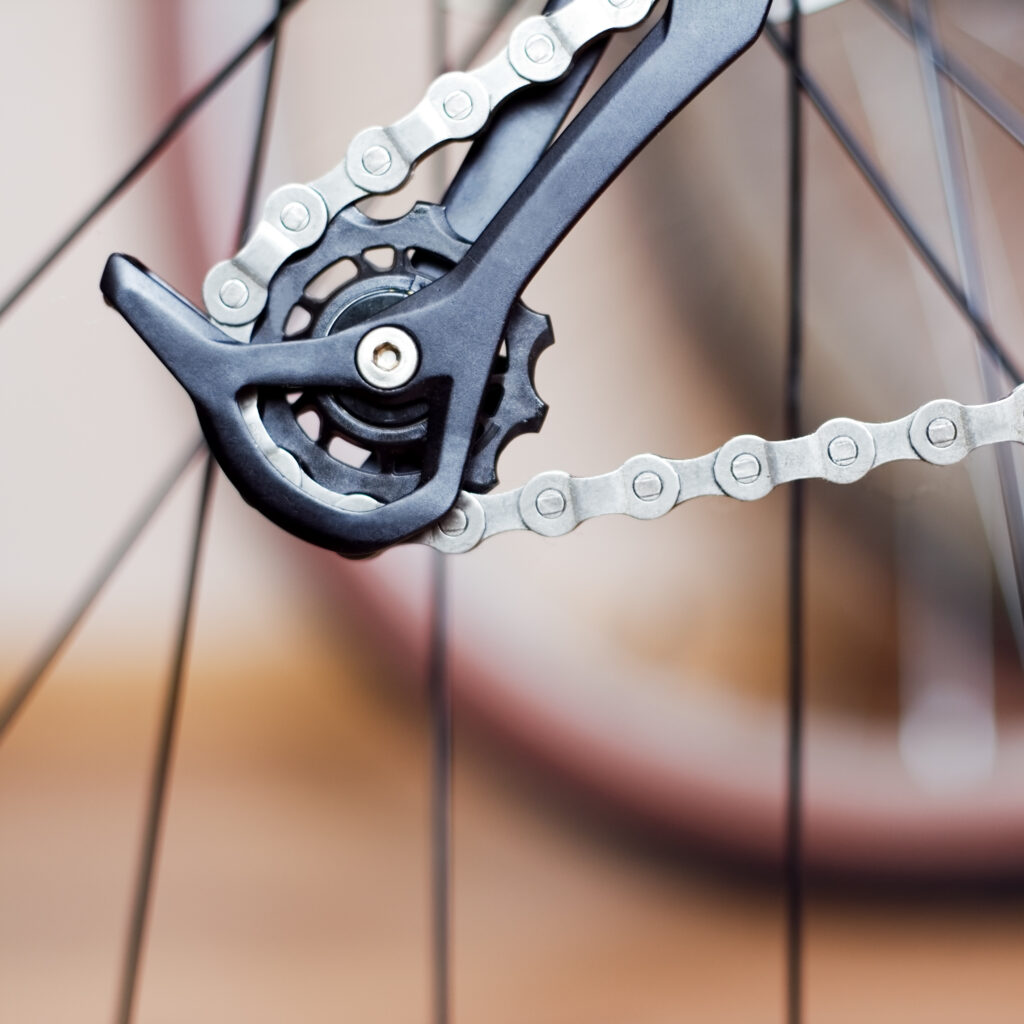
A derailleur is a bicycle component that helps guide the chain from one gear to another. It consists of two main parts: a cage that holds the chain, and a pulley system that moves the chain. The cage is attached to the frame of the bike, and the pulley system is connected to the pedals.
When you pedal, the chain runs through the derailleur and around the sprockets on the gears. The derailleur moves the chain between the sprockets as you change gears. This keeps the chain tight so it doesn’t fall off, and also helps you pedaling more efficiently.
The derailleur is an important part of your bike, and it’s important to keep it clean and well-maintained. If your derailleur isn’t working properly, your bike won’t shift gears correctly and you could have problems pedaling.
Why Tighten a Bike Chain?
Tightening a bike chain is important to maintain proper tension on the chain, which helps ensure efficient power transfer and smooth shifting. A loose bike chain can cause the chain to skip or slip off the gears, which can be dangerous while riding. Additionally, a loose chain can cause excessive wear on the chain, cassette, and derailleur components, which can lead to costly repairs. Tightening the bike chain can also improve the overall performance and longevity of your bike, making your rides more enjoyable and efficient. Therefore, it is important to check the tension of your bike chain regularly and make necessary adjustments.
FAQ
The frequency of tightening your bike chain with a derailleur depends on how often you ride your bike and the condition of your chain. As a general rule, it is a good idea to check your chain tension every few weeks or after every long ride. If you notice that your chain is loose, then you should tighten it.
It is possible to tighten your bike chain with a derailleur without disconnecting it, but it can be more challenging. It is easier to adjust the tension accurately by disconnecting the chain and re-connecting it once the tension is set correctly.
No, a derailleur hanger alignment tool is not used to tighten a bike chain with a derailleur. The purpose of a derailleur hanger alignment tool is to ensure that the derailleur is correctly aligned with the cassette, which helps with shifting performance. Tightening the chain requires adjusting the tension on the derailleur.
Yes, a loose bike chain can cause damage to the derailleur. When the chain is loose, it can bounce around and hit the derailleur cage or pulleys, which can cause damage over time. It is important to keep your bike chain properly tensioned to prevent damage to the derailleur and other components.
If your bike chain is too loose, it will sag and make noise when you ride. If it is too tight, it can cause excessive wear on the chain, cassette, and derailleur components. To check the tension, lift the chain off the chainring and push it up and down. There should be a slight amount of slack in the chain, but it should not be loose. Additionally, when you shift gears, the chain should move smoothly without any skipping or jumping.
Tips to keep in mind when tightening a bike chain with a derailleur
- Be careful not to over-tighten the chain. If the chain is too tight, it can cause excessive wear on the chain and derailleur components, and may make shifting difficult.
- Use a chain checker tool to ensure that your chain is not worn beyond its safe limit. If your chain is worn, it may be time to replace it.
- When reconnecting the chain, make sure it is properly threaded through the derailleur cage and over the cassette cogs.
- If you are unsure about how to tighten your chain properly, consider taking your bike to a professional bike mechanic for assistance.
- When adjusting the derailleur limit screws, make small adjustments and test the shifting between each adjustment. This will help you find the optimal settings for your bike.
- Remember to clean and lubricate your chain regularly to keep it running smoothly and prevent excessive wear. A clean and well-lubricated chain will also help improve shifting performance.
Conclusion
Tightening a bike chain is an essential part of keeping your bike running smoothly. With the help of this comprehensive guide, you now have all the information and resources you need to make sure that your bike’s chain remains in top shape at all times. From learning how to determine if your bike needs a new chain or just some basic maintenance work, down to detailed instructions on how to adjust the derailleur and tighten up the chain properly – we hope our article has been helpful in helping you master this important bike repair skill.
Also Check How Often Should I Lube My Bike Chain?


